Thursday 30 January 2014

The countdown begins!


After a solid 2 days of fixing, in most cases vert by vert by hand, my model has finally been cleared for printing!

It is currently 'In Production' and has an estimated shipping date of Feb 6th, its shipping from America so I'm going to have to allow for some extra transit time. Hopefully it won't take too long to get here once sent of as its traveling by UPS and they are generally pretty good.


Now that I've finally got the test model finished and getting made I can begin focusing on the main models of my project. I thought now would be a good time to write up a time plan for my project as I now have some idea how long it will actually take to get a model print ready and I already know how long it is likely to take me to paint them etc.

So the final hand-in date and presentations are on Tuesday 6th May. Which leaves me with just under 14 weeks from now. Given the time it takes to get models printed and sent back to me I need to use my time as efficiently as possible so I'm not just sitting around waiting for models to turn up!


So here it is - MY FMP TIME PLAN

The plan is subject to change depending on how long shipping takes, estimated printing times for each individual model etc but I will try stick to this as much as possible.


Design/Concepts: 2 weeks (ending 14th Feb)

I have already spent a little time doing some concepts but stopped to get the test model done. I have given myself 2 weeks, the time it will take for the test model to get here, to do all the concepts I will need to get my other models done. (I don't want to start modelling yet as my approach may change depending on quality etc of the test print).

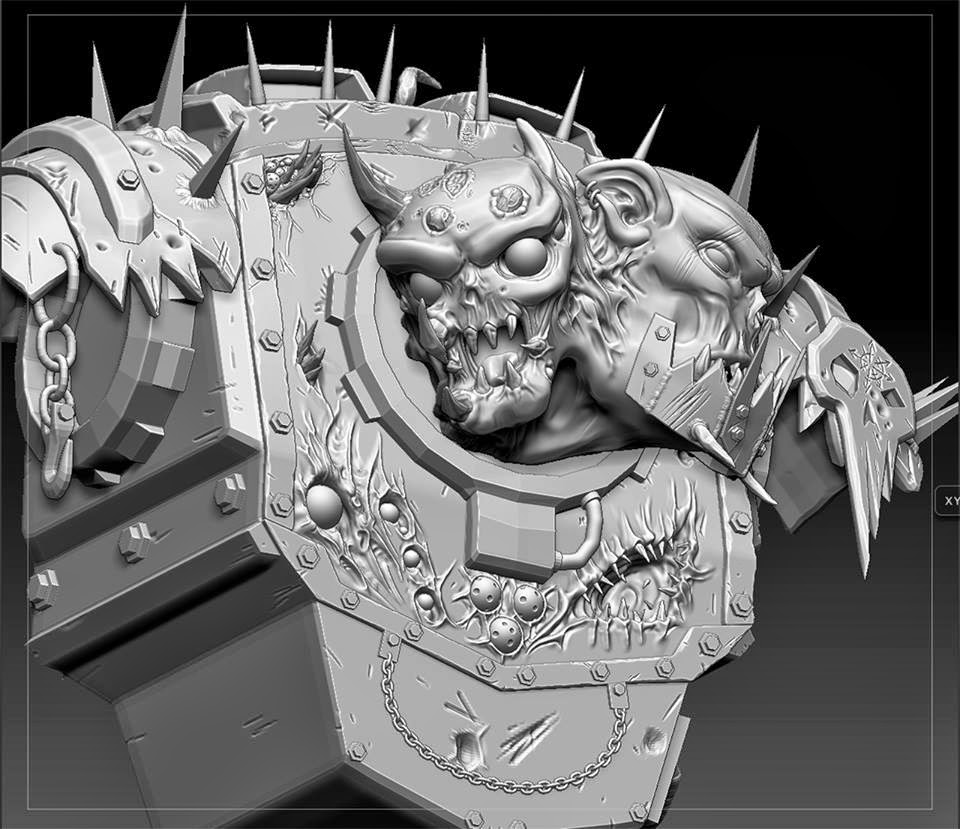
Modelling 1st Figure: 1.5 weeksThe WarBoss, he is going to be my biggest model, the 'HQ' unit as Games Workshop calls them. He is going to be approx 3"-4" and can therefore have more detail than the others. He will be built in a mixture of zbrush and 3DsMax.

Fixing time: 0.5 weeksHopefully if I build my model according to my guidelines (see previous post) I won't need this long to fix the model, but given its going to be fairly complex I wanted to make sure I had allocated time for making changes and alternations that need to happen.

Modelling 2nd Figure:1.5 weeksThe 'Tracker', an elite unit approximately 2" big. I will begin modeling the second figure as soon as the first has been cleared for printing and moved in production. I don't have enough time to wait for the 1st model to turn up before beginning the 2nd.

Fixing time: 0.5 weeksAs with the first model I'm hoping I won't need this long but I wanted to ensure the time was there in case it is needed.

Modelling 3rd Figure: 1.5 weeksI am undecided on what this model will be, either a vehicle unit or infantry. By the time I am modelling the 3rd figure the 1st should have arrived which may influence which unit I decide to make. Depending on which unit I choose I am expecting the size to be somewhere between 2"-4".

Fixing time: 0.5Depending on which unit I do I am expecting to have more problems with this model and am likely to need this time fixing it for print.

The date at this point would be the 26th March. If completed to plan I would have all concepts done and 3 models completed and sent for print, 2 of which should have arrived back.


I would have approximately 6 weeks left.


Painting Models: 3 weeks
I have estimated it will take me about 1 week per model to get the painting done. I have done some model painting in the past (see previous post for examples), so its not like I have to learn how to do it, but it has been over a year since I last painted so I'm expecting some issues along the way as I pick it back up. I therefore think 1 week per model is both practical and achievable.
Fortunately I have a "How to paint citadel miniatures" book by Games Workshop to help me along the way. It can be found HERE!
A page from inside the book detailing how to do some effects.


Extra time: 3 weeksIf it all goes to plan I will have an extra 3 weeks once all the models have been completed.
These 3 weeks will act as a buffer in-case any part of the project takes longer than expected, such as delays in shipping etc.

If I have enough time within these 3 weeks I am hoping to make a base for each model to sit on, which will help finalize them and give them a professional look. I originally thought about getting these 3d printed but have decided I won't have enough time for these to get printed and arrive. I am therefore planning on modeling the bases by hand using 'green stuff' which is a resin similar to those used for printing but can be sculpted by hand at home.
Here is an example of a 'home-made' bases that someone else has done.


I also plan to use this time to work out presentation of my models including professional photographs of the models and displaying the progress work involved. I'm thinking about doing a 'development' presentation for each model including; concepts, sculpts, printed models, painted models and the final 'showcase' images. These could be printed onto large sheets and mounted to sit behind my finished models.

Wednesday 29 January 2014

Model Rejected.....Again

So my 3D model was rejected for printing again, this time down to the walls being to thin. I did expect this so it wasn't a massive surprise. Shapeways told me in another email why the model was rejected and highlighted one specific part of the model that was too thin, however its not very clear, even with a screen shot, which exact part is too thin. Also I have realised that when checking a model they reject it straight after finding one issue (so they don't list all the problems with a model, just the 1st one they come across), and I knew there was going to be more than one part that was causing a problem.

So to avoid a very lengthly process of fixing one bit just to have it rejected due to another (which could have gone on for ages) I sent them an email trying to clarify a few bits I was unsure about.

Here is a copy of the email I sent to their service department who are meant to help with fixing models for print. ---------------------------------------------------------------------------------------------------------------------------

"I'd like to clarify a few things if possible about my model to try help me update it and get it suitable for printing.

Firstly I am unclear as to what 'wall thickness' is referring to, compared to things such as detailing etc. I understand that their are sections of my model, such as the part you highlighted which are too thin, but for parts such as the spikes I'm not sure how the thickness is affected or how to fix the problem.

I am aware I have several parts on the model, mainly fine details, which are bellow the thickness/size required to print, this is down to poor design on my part as I didn't know there was a minimum thickness limit when making the model. Now the model is finished and the geometry is quite bad (thanks to zbrush decimating) I'm finding it difficult to work with the model and scale any bits very easily.

I have enclosed a picture of my model, highlighting a few more areas where I know the wall thickness is too low (measurements are circled in red), put I am unsure what to do in order to fix them all. Small parts, such as the little spikes on the armour (bottom right picture) could be removed completely and I could put those in myself manually later. Other parts such as the bigger spikes on the shoulder pad are a suitable thickness at the base of the spike and then taper until they are well bellow the required limits. This is a similar problem to the highlighted spikes on the metal face/jaw plate, which is where I believe you originally highlighted an error. Depending on which dimension you're measuring in, certain little features are either within or bellow the required 0.8mm.


In order for the model to be printable does every single aspect/detail need to be above 0.8mm (apart from surface detailing), including spikes etc. So for example do the spikes need to be made in such a way that even at their tip they still measure at least 0.8mm. Also are there any sections on the model (such as in the Ork's mouth) where detailing such as the teeth are Ok, even though they are less than the required thickness.

The most obvious solution would be to rescale the model until it is big enough that all parts are thick enough, but upon attempting this I found the cost of printed escalated too much for me to afford.

I'm a university student working on this model as part of my Final Major Project, this is actually just a test model made to help me grasp 3D printing. I am planning to get a further 3 or more models printed with yourselves of a similar size. Obviously I have a lot to accomplish in a limited time frame which means I don't have much more time to attempt fixing this model and no time left to redo it completely.

I'd appreciate any insight or help you could give me in getting this model ready for printing. 

Regards
Luke Evans"
------------------------------------------------------------------------------------------------------------------------------

Their response was fairly generic and unfortunately didn't really answer any of the questions I had asked so I won't bother posting the reply I got here.

However one useful bit of information I got was about their 'Automatic thickness checker'. I knew this existed as it had given me warnings, but I didn't know the text was actually a button leading to an interactive screen would could be used to view the model showing the problem areas highlighted!
Here is a screenshot of the tool, clearly displaying some troublesome points, although it says 8 problem areas its inaccurate, there were lots....lots more. 8 seems to be the max it will tell you.


Using this tool I was able to clearly see the issues that would mean my model kept getting rejected until fixed.

And so began the extremely lengthy process of fixing, uploading, checking and then re-fixing my model. Uploading the model is the only real way I can see if I'm fixing the thickness issues and doing so takes ages.  On top of the time and stress inherently involved in this process it is worsened by the fact the required thickness seems to keep changing! Bits that i have fixed and then replicated to speed up the process are fine in one part and to thin on the other?! How does that work? It also seems that every time I upload the model some parts that were fine before are now to thin.... The messed up geometry could be the cause as verts are all over the place making faces erratic and oddly shaped which is sometimes picked up and flagged as making sections too thin.

The issues seem to be never ending and its approaching the point that I have spent more time fixing the model than it took me to make it, and fixing has meant I've had to alter bits drastically or in some cases completely remove parts of the model altogether, so I'm worried the model will end up nothing like my original sculpt!

I have put too much time into this model now to not get it printed so I'm going to continue fixing bits (removing if its easier) until it can be printed. Hopefully the next time I send it to print (today all being well) it will be the last and it will finally get the go ahead.


Monday 27 January 2014

Test Print Summary - Future Guidelines

At this point in time I am still waiting to find out if my model has been given the go ahead by Shapeways to get printed. I think I fixed the issues they made me aware of so it *should* be okay provided the bits bellow 0.7mm aren't deemed too important.

As my last post shows the last few days have been busy, stressful, a little bit disappointing but overall an important learning experience. If I had waited until my final models were ready to print before attempting the stressful procedure that is 3D printing, I would have been forced to face all these issues far to late for me to do anything about it.

Given what I have recently dealt with I decided it would be a good idea to do a basic sum-up of what I learned through the process, and write some guidelines for myself to follow from here onwards. Hopefully by following these guidelines I will be building my models in the correct way, and therefore have less problems when it comes to printing.
1 Million Triangles
This isn't flexible, the whole model must be below 1 million triangles to be printed. If a model needs to be bigger I can work around the limit by breaking the model into separate pieces to be printed.

Less Elements/Shells
Although this isn't a huge issue less elements/shells are apparently better when 3D printing. Also the model being in less chunks will make rescaling easier if its needed.

Detached Objects
No parts of the model can be detached or 'floating' from the rest of the model, this will result in immediate rejection for printing.

File Size
The submitted file can be no bigger than 64mb.

Wall Thickness
Walls of the models must not be thinner than 0.7mm. This is easily achieved by attention to detail when building the model and also careful design ensuring details are relatively simple and chunky. This aspect is much harder to fix later on down the pipeline so being careful of wall thickness during modeling will save a lot of time later. This can also be avoided by intersecting parts of the model where possible.  

 
Model Size
I need to decide on the size of each model early in the design process and build the model with this in mind. Altering the size of a finished model is difficult and can lead to spiraling printing costs.


General Careful Building
This includes various issues such as flipped faces, manifold edges and gaps within the mesh. These are relatively easy to fix with the program Netfabb but it doesn't hurt to try avoid these issues in the first place by building carefully and sensibly.

Following these guide lines should make the jump from modelling to printing much easier and reduce the chances of me being disappointed by my model not being suitable to print or having to remove details etc.

Issues getting ready to print!

I've been getting my first test model ready to print over the last few days and have encountered numerous problems. I was expecting a certain amount of problems and fixes that needed doing but I wasn't prepared for quite so much going wrong!

Firstly I managed to get my test sculpt completely finished, I was actually really happy with it. I decided I didn't want to do the whole model as this would increase the time it took me to make and the cost of getting it printed. So I just did a bust and I got it done from start to finish in about a week, which was pretty good.
Here is some pics of the finished bust.


I even made a little stand for it so it could stand up alone (the base isn't flat).


Despite Zbrush having a 3D printing export plugin, I wanted to export it into 3Ds Max first so I could fine tune any sections of the model and rescale anything I wanted easily. Upon importing the .obj file into Max I was confronted with an import of almost 9million polygons. After reading some guidelines on the Shapeways website I found out this was far to complicated. I made the mistake at the beginning of the project in thinking 'its not for use in a game I can make it as complex as I want!'. this simply isn't true. The triangle limit for 3D printing (at Shapeways at least) is 1million. I could work around this by breaking up my models in the future but for the purpose of the test print I just needed to simplify it at bit.

This wasn't a difficult process to do within Zbrush. Although I had decimated the model somewhat, believing I had an unlimited budget meant I simply hadn't done it enough. I was very quickly able to get the polygon count of the model down from 9million to 340,000 without losing any real detail from my model. These images show how zbrush likes to decimate a model. (Anyone that knows 3D will know this is a horrible use of polygons, but thankfully the use isn't important, just how many there are!)


After sorting the triangle count down to well within budget I followed more instructions on the Shapeways website (found here) and downloaded a program called netfabb whose website can be found here!

Netfabb is a program primarily used for checking models for any errors or issues that would cause faults when 3D printing. It automatically checks and fixes several issues including; holes, flipped faces, manifold edges and if a model is water tight.

The first issue I faced was due to scaling problems, a model made in Zbrush has completely irrelevant dimensions when put into a program specifying something for real world printing. During fixing smaller parts of my model would disappear. I worked out this was because part of the auto fixing script removed 'shells' (equivalent to elements in 3DsMax) smaller than 0.02mm. Which obviously lead me to question what the overall size of my model was, turns out it was really really tiny. My model in netfabb.


Netfabb has tools in it to re-scale models, which auto scale all the dimensions to retain shape. The process of rescaling was therefore pretty simple, but it lead to another problem, 'how big did I want the model?'

This was a little harder to fix as I found there needs to be a balance between size and affordability. The purpose of the test print was to see how much detail I could get into a model that got progressively smaller and therefore finding the point at which a model was too small to get in the detail I wanted. Getting a big 4inch model printed (although awesome) would have been pointless to my experiments.  I measured various GamesWorkshop models that I own to get a general idea of how big I wanted my model to be.

The first model I uploaded to Shapeways was a modest 2.5inches. I thought this would have been a good compromise, it was bigger than most Games Workshop models (apart from Forge World specials) but not so big it was pointless to do.

Shapeways has an automatic filter which checks the suitability and details of models uploaded. I had made sure my model fit all these specifications before uploading, apart from one, which is different depending on which material you're printing in. The wall thickness. This lead to another more major problem with my model.
My model uploaded to shapeways with details, prices and warning.


The material I've chosen to get my model printed in is a strong & flexible white plastic that is capable of printing high levels of detail. This material (and most others) requires that no section of the model is under 0.7mm thick as it will be too thin and could snap. So after uploading I got a warning saying my model had 'very thin walls' meaning some sections of my model where bellow the 0.7mm required.

I took my model back into netfabb, which has a handy measuring tool allowing you to quickly see and identify parts of the model that are too thin. Unfortunately it was practically every single detail on my model. My first reaction was to just make the model bigger until all the parts where thick enough, I found this made the model cost jump from $33 to a staggering $170, and yet I had only doubled it to 5inchs. I obviously couldn't spend that amount of money on a test model so I had to start rescaling parts of the model.

During the process of rescaling parts I became increasingly frustrated! The model looked fine in zbrush and max, everything looked in proportion and accurate, so why where the details becoming so small when the model was still relatively large at 2.5inches. I'm still not even sure. I reevaluated all the games workshop models I have and went through some carefully measuring the thickness of the smaller details. Although there are some very small fine details, no matter how small the games workshop models get, the details are always approximately 1mm or bigger. So I realized my model is just too complicated, it has too many details and they are far to small. Everything needs to be simpler, bigger and chunkier.

Rescaling a  model is extremely difficult and inaccurate when the model has been finished and the geometry is really poorly laid out (thanks to decimating in zbrush). I had to make a choice whether to take a few steps back, return to zbrush and completely redo large sections of my model, continue to attempt rescaling or just payout for a massive model. Given this was just a test model I didn't want to put any more time into it or spend too much money. So I continued attempting to fumble around with rescaling. Another idea I had was to get rid of the base, although it looked nice and made the model look like a tasty bust to sit on my desk, it wasn't needed at this time. Removing the stand detail and shortening it meant that even with the model still at 2.5inches more of it would now be the main model and not the stand, meaning the chest is closer to 2inches than it was before.
Rescaled model with less base!


I eventually got to a point where the thinnest parts of the model had been bulked out, some still didn't meet the 0.7mm guidelines but I re-uploaded it anyway. I got the warnings about wall thickness but ignored them, a technical guy checks over the model if this warning pops up after purchase, so I thought he could deal with it!

The new price of my model at 2.5inches is $60, which I have guessed is due to the model now having a higher % of detail as I have shortened the stand but kept the size the same. This is still more money than I wanted to pay, but I cannot make the model any smaller than it currently is. As this model is so much larger than I am likely to have any future ones printed I am no longer experimenting in the level of detail a small model can achieve, so I briefly thought why am I even bothering to get this printed at all?

I then realized there is still plenty of stuff I can learn by getting this test print done. I can see how long it takes to get the model checked, printed and shipped, I can also see how long shipping from overseas will add to this time and if the models are likely to get damaged in transit. I will also be able to see upfront what the material is like, how good the printing is and what details at various sizes actually come out like.

So I went ahead and purchased the model, only to have shapeways email me a few hours later saying they can't print it and gave me store credit back. Thankfully shapeways didn't just say 'no', within the email they included the reason, which turned out to be sections of the model where floating freely from the rest, which would obviously fall if printed.
Here is the screenshot they sent me back, highlighting the issues.


I looked back at my model and during all the rescaling (remember I said it was hard once it had all been built), parts had moved away just as shapeways had said. These were quick and easy to fix so I had the updated model re-uploaded within an hour or two. I purchased the model again using store credit and am currently waiting to see if shapeways confirms or rejects the model for printing. 


Wednesday 22 January 2014

Conversion Kits

As part of my reference I bought some 'conversion kits', which are exactly what they sound like, small kits made to slightly convert or alter models. Most models, though packed with details, are fairly generic, so their are a wide variety of kits available (largely from Games Workshop's sister company Forge World). These kits can contain a range of different parts which can add extra detail to units, for example making them fit a certain army; by use of transfers, shoulder pads with chapter logos etc. This helps to make armies look more uniformed and interesting than solely painting them in their specific colours.

Another use of conversion kits is the reinvention of your models, such as using select parts from kits and attaching them to other races or unit classes. Although this has limited uses it opens a new avenue for hobbyists to explore creating interesting alterations and mixing up their own units.

Chaos and Ork conversion kits already exist (separately), so I bought myself some as I thought using these could give me a really quick and easy way to put some combinations together without worrying about having to design sections myself. 

These are examples of the type of parts found in a conversion kit, the ones shown are from the Forge World Ork conversion kit. Found here!

I was able to quickly put together some fairly simple models using these parts and some from standard Chaos models.

Here are the two models I made.


These models are pretty interesting but I don't consider them to be a very good mix up of Chaos and Ork as there is no real integration of the two races, they don't flow. With my models I'm trying to intrinsically meld the races together by making the Orks look warped and changed by Chaos. What I'm aiming for couldn't realistically be done with conversion kits.

However I do think conversion kits could have a place within my project, if I made my own. I am still planning to make my 3 models myself but parts of those models could be broken off and 3D printed again on another sprew. I'd then have a proper Chaos/Ork conversion kit of my own and I could use that kit with other models to quickly bulk up output and potentially have many more units by the end of my project!

Making the extra conversion kit parts would be relatively simple, most could come straight from my 3D models when they are finished, using those parts to modify other models would also be pretty quick to do. The time however would come from then painting those models. Painting my models is a big part of the project, bigger than might be expected, but a good paint job is what makes the models stand out and come to life and properly painting models takes time. I'm allocating time to paint my main 3 models but I simply may not have enough to paint several more afterwards.

Maybe I could make them and leave them grey or black, I'm not sure how that would look sitting next to my fully painted models. Hmmmm, not sure about this one. I think I'll have to see how I get on with my main models and make a decision a little later on when I have nailed down a time frame. 


Sunday 19 January 2014

Test Sculpt Progress

In order to get a better idea of printing capabilities,materials, turn around time and any possible issues I've decided to do a test print as soon as possible. I'm not putting any real design effort into my model as I want to get it done and sent off relatively quickly.

I therefore jumped straight into Zbrushing. Here are some of the latest screens of my model in progress.


Please bear in mind these are very early progress shots, I'm just trying to get the basic shapes and stuff in at the moment. I will be refining it quite a bit over the next few days along with making the rest of the body. Although this is simply a test sculpt and print I still need to get a decent level of finish and detail on the model or I'm not going to get an accurate example of 3D printing capabilities and limitations.

Saturday 18 January 2014

3D Printing - The basics

Given my end results is having my 3D models printed I obviously need to look into several areas involving 3D printing and how it is done. I wanted to get this research done early as it may impact the way I design and make my models and how soon I need to plan on getting the finished models done and sent off.

Basics of 3D Printing3D printing, known also as Additive Manufacture, is a form of rapid prototyping where models are made layer by layer without the use of molds. There are different forms of additive manufacture which work in different ways but essentially follow the same principles. Each method has its own advantages, draw backs and suitability to a certain project.
The following table shows the different types of 3D printing available, the technology they use and the materials which can be printed with each method.

Selective Laser Sintering (SLS) is the most commonly used method for 3D printing smaller objects and is the technology used by the smaller hobbyist printers that are available for home use. This is also the type of printer which is used by companies specializing in printing models over the internet for people.

Here is a short video showing the step by step process of laser sintering from researchers at the University of Texas, Austin. This technique produces solid objects from polymer and metal powders.


Materials

Depending on where I choose to get my models printed I have a choice of materials they can be made in. Different materials have various advantages, disadvantages and applications, which is something I must consider when choosing my material.
A few of my options include:

Strong Flexible Plastic - Great starter material, easy design rules, feels rough but is available in a polished finish.
Alumide - Brittle Nylon Plastic filled with aluminum dust, available in polish and smooth finishes.
Detailed Plastic - Acrylic based polymer that can print fine details, smooth and slightly shiny.
Frosted Detailed Plastic - UV cured acrylic plastic that prints fine details, smooth and translucent.
Steel - Durable, shiny surface and slightly pitted and rough.
Sterling Silver - Available in 3 levels of polish.
Brass - Smooth glossy finish.
Elasto Plastic - Ultra flexible, off white plastic with rough texture.
Full colour Sandstone - Gypsum printable with colour textures on model surface, feels like matte clay.
Ceramics - Food safe glazed ceramics, available in glossy and satin finishes.


Looking into the available materials has been interesting and helped me decide what would be best for my project. From the options I have listed here I think Detailed Plastic would be the best choice as it is relatively inexpensive, can print at high levels of detail and is smooth. Other options may work but I can rule them out due to their rough texture, as I need my models to be smooth, as bumps in the material may be mistaken as intended details etc.

This choice of material can limit my choices of company as they do not offer different types of printing material.


File Types, Sizes and Programs
This is a very important aspect of 3D printing, the size models can be is not only limited physically but electronically. All providers specify the type of file format they will accept, the size limitations of the files and programs which can be used to make them.
As a general guideline (although these may vary from website to website) -
Maximum File Size: 64mb or 1 million polygons
File Types: DAE, OBJ, STL, X3D, X3DB, X3DV, WRL
Scaling: millimeters, inches or meters.

Prices

Prices will obviously vary from company to company and I need to take shipping and handling costs into account. I can however estimate a rough cost of 3D printing based upon several website quotes.


Approximate cost of printing is £2 per cm3, depending on the selected material.
I estimate my models will be 7cm3 meaning each model will approximately cost £21.
I plan on sending 3 models off to be printed, totaling £63.

This cost does not include shipping and handling as this can vary greatly between websites, I also specifically plan on one model being substantially larger than the other two which will alter the costs. I therefore think it is a fair estimate that my finished models with all included charges could cost up to £150.


Turn Around Time


This aspect will again vary greatly between websites. Some websites estimate a turn around of 10 business days, however they are based in the USA, meaning there could be significant delays beyond their control.
Other sites based in the UK offer turn around times anywhere from 3 days to 18 days. Though these sites may take longer to dispatch the chances of having delays in shipping and any potential damage to the models is greatly reduced. I will need to take all these aspects into consideration when choosing my provider.

Companies
Although I haven't yet decided on the provider I will use there are plenty of online companies to choose from. I will make my final decision closer to the time when I will be sending my test model off to be printed. This test model will allow me to review the selected company's abilities to print to a certain level, their pricing and turn around time. This will allow me to change my mind before I need my final models printing.

Websites I have selected so far:

UK Based
http://www.3dprint-uk.co.uk/
http://www.3dcreationlab.co.uk/

Europe Based
http://i.materialise.com/

USA Based
https://www.shapeways.com/
http://www.sculpteo.com/en/

My Model Paintings

Given I'm planning to paint my finished 3D models I thought it would be of some interest to look at the model paintings I have previously done.

This standard Dreadnought is the first model I painted and isn't even 100% finished. 
Obviously as my first attempt at painting it isn't amazing, but it isn't bad either. I was able to teach myself a lot of the required techniques for painting models during this painting project.
The original model can be found here.


This Space Wolf Dreadnaught is the 2nd painting I ever did and shows vast improvements in my abilities to paint Warhammer models. This model was much more of a project and included a certain aspect of design. The model itself was very basic, I added a variety of extra details from various kits, designed and custom built the base myself and added the Ork to create a scene. This model wasn't designed or built to be played with but was instead a showcase piece (made for a friend). 
The original Space Wolf Dreadnought can be found here, the Ork in the scene can be found here.


This model was the 3rd one I painted and as with the model before it I incorporated a certain amount of design into it. The model itself was part of a kit involving 4 other units, but I wanted to focus on just one. The scenery around the model isn't included with the kit, I made it using other kits and 'green stuff' (a Games Workshop modelling putty). I put the pictures of this model onto Dakka Dakka, (a wargaming community website) and have received over 4970 views and high 'coolness' votes!
The kit including this original model can be found here.

I have painted one other model since this one but haven't taken any photos of it. I find reviewing my previously painted models helps me in trying to visualize and imagine what I want my finished models to look like. Although I haven't painted many models I am confident that I will be able to paint them to a good standard once they are printed.

First Sketches

Over the last few days I have been sketching up some quick basic ideas for my units. I still need to decide specifically what units I want to make but I am aiming for at least 3 (if possible basing on 3D printing times etc).
I am thinking a range of units would be a good idea, therefore 1 x Hero unit, 1 x Vehicle unit and 1 x infantry unit would be a good starting point. This variety of units allows me to explore size, functionality and design throughout my army.


Chaos Reference

As I have previously  done with Orks, I have gathered some basic reference on the Chaos models that already exist. Chaos has two distinct armies, Chaos Space Marines and Chaos Daemons. Although I will take some reference from Chaos Space Marines I think the Daemons are more relevant and are likely to play a more important role in my design process.

Models from the Chaos Space Marines Armies:


As with the Orks there is a large variety of units within the Chaos Space Marine Armies, there is however less of a uniformed feel and style throughout the race. Chaos Marines are not of much use directly within my project however they offer a very interesting and important insight. Chaos Space Marine units are based upon standard Space Marine units which, as the name suggests, have been turned and transformed by Chaos. These transformations can produce different effects with varying degrees of severity but these models give me an idea of how chaos transforms existing units, which is exactly what I'm planning on doing with Orks.

Models from the Chaos Daemons Armies:


An interesting aspect of the Chaos Daemons is the fact they have 4 different 'gods'. Depending on which god a unit is meant to follow/worship the unit's whole style and colour palette will alter.
Here are examples of a basic troop unit from each deity:

Plague-bearers  of Nurgle:


Pink Horrors of Tzeentch:

Bloodletters of Khorne:
 Daemonettes of Slaanesh:


In order for my race to be authentically Chaos I will need to decide which god I want my units to follow, as this will in turn alter how they should look. My initial sketches and ideas seem to be more closed linked to units following the god Nurgle but I will have to see how my ideas continue to develop as I don't want to nail down a specific way all my units should look this early on.